Monday, 2 March 2015

Medieval Wall Southampton

In the heart of Southampton there are buildings which resemble a castle shape with the English flag on top of it. "Southampton's town walls are a sequence of defensive structures built around the town in southern England. Although earlier Roman and Anglo-Saxon settlements around Southampton had been fortified with walls or ditches, the later walls originate with the move of the town to the current site in the 10th century." -http://en.wikipedia.org/wiki/Southampton_town_walls

These walls were built in medieval times, and represent a defence mechanism. Southampton suffered in the Second World War. These walls are still in Southampton today so I decided to take a visit to see these walls. 


Along the road: 


Thursday, 26 February 2015

Theatrical Miss Haversham Experiments

To help me decide what look I wanted to do for Miss Haversham I decided to try out a theatrical makeup look as well as a TV more subtle ageing look. Today was all about experimenting with the tips we learnt in Sue's ageing lesson. I found it really helpful to follow the natural creases of my own face to create these lines and wrinkles. 

Products Used:
Skin Base, Illamasqua
Charles Fox supracolour, purple, red, white, black
Charles Fox Concelar palette

Firsty I primed my skin as well as using skin base from Illamasqua. 


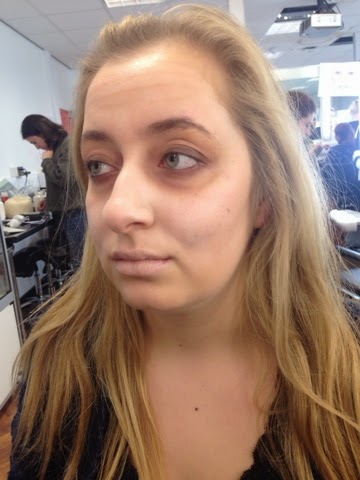
Then I started following my creases exaggerating these of course! I added crows feet, frown lines, forehead lines, smile lines, creases on my nose and lips and dark under eyes. 


I added a redish browny shade onto the under eyes to make them look really dark and sunken. 
I really loved the effect of this concelar underneath the eyes. I smudged it in with my fingertips to warm the product.
I decided to use my supra colour to add a tear drop onto the cheek to add a little more of a Miss Haversham feel to the look!

Next time I want to experiment with a more subtle ageing for a younger Miss Haversham. 

Early, Mid and Late Victorian Hairstyles

From my research I've found out a lot so far on Victorian hairstyles. Through the era women changed the fashion of hair quite drastically. In the early Victorians women were seen in portraiture to be wearing very sleek hair styles. From image research I've noticed many centre partings. Decoration was an important part of dressing the hair for Victorian women. I found texture in the portraits at the top of the hair flowing in an almost 'finger wave' motion at the top of the hair. Women wore tightly formulated buns on the top to the mid section of their scalp. Often these had plates within the buns or some kind of decorative flower or laced effect. The bun almost has a circular motion with hair going around the bun in a very sleek way. A lot of portraiture has women wearing a symmetrical style with curls facing inwards to the face with a straight part at the top, this would only be the very front section of the hair which seemed a little shorter to the back as women had very long hair as they never believed in cutting it. The condition of the front of the hair may have been shorter due to it maybe snapping off.

I've researched a few portraits of women at the time from the start of the Victorian era further to late Victorian times. Here is my idea of an early Victorian style. (This image has an unknown date. http://www.beauty-and-the-bath.com/beautiful-victorian-hairstyles.html)
The women has curls facing inwards to her face with a centre parting. The back of the hair is in a structured bun with decoration throughout the hair and crown of the head. She does have a little hair flowing down at the back of the head but usually women did not cut their hair so the women may've had extremely long hair to all fit into a tight bun which was fashionable.


Here I've practiced my own version of an inward curl ringlet. I used curling tongs to face the curl inward to get this effect.


The opposite side of the hair went well and I'm pleased with how it turned out. It looks like an early Victorian style. 


At the back of the head I wanted to make sure the whole hair was going to be put up. At the time buns were quite simplistic so I just wrapped the hair around and pinned it in place to create this bun.


Next; for a mid Victorian hairstyle I wanted to create the look which hair is centre parted and then wrapped around the ear. This look was inspired by this image which has a slowly progressing lower bun. The hair looks a lot more relaxed and not so done up. It's a little more casual but still very sleek like the early Victorian styles. 
I added a little twist on my recreation using a simple plat each side of the head which was brought slightly more forward to get the swooping effect around the ears on the sides. 


Lastly the next part was to look into 'late Victorian' hair. I found the styles to be a lot more relaxed, romantic and looser. Curls were still a big part of doing the hair but hair tended to be worn down more often. Some of the curls in the image below look as if they're facing outwards from the face too which is different to the early hair styles. 


Another hair image I really liked which had the hair done up in a loose brought forward to the face style. This style seems to still be similar to current trends in our century which is quite interesting. 

I decided to take on board the styles of late Victorian hair from my research and incourporate these into my designs for practicing late Victorian hair. Because the styles are a lot looser and more romantic curl looks it's very important you must curl the entire hair before styling to give the hair more body and shape to give the final outcome.i tried to make the final style to have curls running downwards towards the back and the hair at the sides to be in a middle parting and for the mid section to be loosely up ontop of the crown.


The front of the hair was styled by curling inwards so it gave a wave on top of the parting.


Late Victorian hair is definitely on of my favourite styles to recreate and I look forward to practicing and perfecting these styles. The hair from the time reminds me of bridal hair too the way it's so flowing and pretty, which reminds me of Miss Haversham from Great Expectations original style from her wedding. 

Theatrical Ageing

Theatrical Ageing


For the theatre you need to make sure makeup is much more elaborate so that the whole audience can have the same image of the character. Ageing is used in ways such as: adding lines, wrinkles, age spots, flushed cheeks and missing teeth and this can all be done by the use of cosmetics. This is the opposite to beauty makeup, in this case we want to pull out all bad features including making dark circles, lines and creases and adding crows feet around the eyes.

Products needed:
Primer
Moisturiser
Supra colour kryolan pallette 
Palette knife to depot products
Foundation in models skin tone
Disposable mascara wands
Tooth dye (kryloan) 


Step by step theatrical ageing process:


Cleanse, tone and moisturise the skin to prep it for the theatrical makeup.

Optionally add a base to the skin foundation and concealer. 

Add moisturiser into a palette and mix together with kryolan supra colour greasepaint with a brown/green/dark red and a tiny bit of black to add the lines, only add a moisturiser to your colour if it's a grease based product. This is to make lines and wrinkles. 

Firstly go around all creases of the face; smile lines, frown lines, around the nose, on the edges of the nose to thin it out, thin the lips, screw up the eyes and make crows feet. This can be done quite dramatically as it's for the theatre. To draw on with a thin small brush.

Now to make bushy eyebrows mix together yellow and white supra colour to get a pn old hair colour. This will then need a small mascara wand to brush through the eyebrow hairs, go against the brows to get to the root and back to lay smooth.

Now add a little foundation onto a brush to use on the lips, get your model to scrunch the lips up and paint on to them to make them look like dry skin. 

Use a stippling brush to add a red flush to the cheeks, and nose blott in with finger tips to smudge out. 

To yellow/darken/block out teeth dry the chosen teeth with a cotton bud and then add the tooth solution on with a cotton bud, this will give a really realistic effect when it comes to staging. 


Here are the results of my first practice of theatrical ageing:


Hand ageing:
Products:

Liquid latex (kryolan)
Barrier cream (kryolan)
Disposable sponge
Foundation in correct skin colour
Hair dryer 
Translucent powder

Cover model with a cape ensuring the latex/makeup doesn't get onto the models clothing, it will stein.

Put a barrier cream all over the area which you're going to makeup, rub well into the area.

Pour a little liquid latex into a small bowl.

Dip a disposable sponge into the bowl, add a moderate amount to the sponge and then start applying to the area (in this case the hand)

Stretch the skin of the hand, stipple the product in a dabbing motion and feather at the corners so you get an even finish. 

Use a hair dryer on a cool temperature and blast over the hand gently. 

Optionally use makeup in a skin colour suitable to the models skin tone over the top of this. 

Stretch and ease the latex, this will create small ageing lines appear. 

Powder over the top of this to make the skin look dry.

Use warm water to rinse this off, do not let it get down the sink as it may cause blockages.


Death Mask

  1. Today we experimented with some creation which was a little unusual and unfamiliar to me. The death mask. The death mask is a representation of a real persons face which will be moulded on top. This has been done many times in history in different eras all for different reasons. In the Victorian era the reason behind a death mask was to reflect on a loved one. They would place the piece in their lounge area to remember them exactly. The death mask started in Egypt as a spiritual way to allow that person to follow on to the afterlife. 
  2. "A death mask is a wax or plaster cast made of a person's face following death. Death masks may be mementos of the dead, or be used for creation of portraits."-en.wikipedia.org/wiki/Death_mask

"The most recognisable belonging to King Tut. The Egyptians believed that the death mask, which would be buried with the individual, would allow the person's spirit to find his/her body in the afterlife."-http://www.biography.com/news/famous-death-masks

In class we practiced the death masks on our own faces. We discovered that taking photos of our faces in different shadows with a light source shining on (I used a torch from an iPhone) it would bring out certain features which a death mask would also do. The skin under this kind of light gives shadow and definition of the bone structure of the face. I found that the skin looks more sallow in these photos due to the harsh light bouncing off different areas of my skin to make me look more 'deathly'. 


The first light source was placed at the side of my face lighting up half my face and giving the other half a lot of shading. 


Here the light is placed below the face making the light seem more dim. I found a lot of shading and light to be focused on the underneith of my chin, my nose and under my eyes giving them dark circles.


Here is my first attempt of a death mask. My shaddows were reflecting on the photos I've taken and show darkness around the jawline, cheekbones, sides of my nose, sides of temples, chin and the light has bounced ontop of my cheekbones to look more skeletal, paled my eyes lips and cheeks out too.


My second attempt was to create a more dramatic and deeper toned skin tone. I decided to deepen the shadows by using supracolour with a grey-black shadow powder on top. I think my blending could've been a little more perfect but I generally like this attempt more as it looks more realistic and death like. 


The more I blocked out my lips I found it helped more. It gives a washed out appearance of the face. 

Wednesday, 25 February 2015

Miss Haversham Second Trial

Today was my second attempt of trying out my Miss Haversham design. It didnt go as subtle as I hoped I feel I was a little too heavy on the products today but I'm glad it was only a practice.

I used the same technique as my first attempt of my facechart look. However, I was really please with how my 'caged lip' turned out today using duo lash glue.

Firstly I primed the skin and started to buff the skin base onto the high points of the face.


The frown lines, smile lines and crows feet were created by getting my model to screw her face up in the appropriate ways so that I could place these features in the suitable places. 


I blended this in well so it would look more realistic for a TV series look. 

The eyes were using my supracolour palette making a sallow yellow/browny shade. I poped MAC Gloss ontop of the whole area which I was pleased with the outcome. It looked very glossy and sallow which is exactly what I was hoping for.


I did not get time to add a strong contour or age spots today as I ran out of time.
I will do this in next session so I am confident to get them equal on both sides.

My first attempt of the lips in my opinion did not go well at all! I used too much of a thick brush and dark colour to create the lines of the creases in the lip. I added duo over the top but not enough, I decided to focus on getting this lip perfect so I tried again. 


I used a red colour to add the lines in the lip this time and then plenty of duo glue over the top to smudge in to make the lips look all dried up. 


I was half pleased with my final look but definitely need one more practice to make this look perfect. 

1st Attempt Of Face Chart

Products needed:

Moisturiser
Primer
Skin Base over forehead, under eyes, tops of cheek bones and chin
Mixed red, black, green and yellow supracolour for the wrinkles to be blended out
Yellow/purple/red supracolour for the eye circles
Grey kryolan shaddow for the deep contour on cheek bones
Translucent and White powder to dust on top of the skin base
Dark brown shadow to darken eyes
MAC Gloss pot to go over the eye sockets and underneath
Duo lash glue for the lips

To begin this look I moisturised my models face, primed it and then begun to buff in skin base in white around the natural features of the face which are naturally highlighted by light, the Satis house was lit by candles mostly so the face may appear more harsh than it would outside because of shading. I then used a thin brush to mix in the supra colour which would be a suitable colour for the lines and wrinkles on the skin. Yellow and redish colours were blended into the under eyes to give it a dark eyed effect. The yellow makes the eyes look more sallow. 
I then applied a translucent powder around the areas of grease. Which then I used a white powder over this to give it a dry skin look. I used a grey and black mixed and applied a line from the top of the ear down the cheek bone to give a strong sculptured contour. This was then blended out with a thicker blending brush. The brows were brushed upwards with a disposable mascara wand.  I used a slight blush to give the cheeks a flushed appearance, I may not do this next time though as I think Miss H should look more stone cold rather than appear hot with flushes. I then added a little brown smudged and smoked on the lashlines of both sets of lashes to make her eyes appear more closed and tired. 


To finish the look I added a foundation onto the lips while having the lips scrunched up. This allowed the foundation to go onto all the creased areas to make it appear wrinkled. I forgot to add duo lash glue onto of the lips but next time I will to add a flakey lip effect.