Wednesday, 15 April 2015

Queen Victoria

Queen Victoria was an important part of history, especially in Britain. The Victorian age was named after her as she had such a big impact on society at the time. As she was a queen for 60 years she changed a lot of things quite dramatically. She became queen when she was just 18 years of age which now would be very rare as that is just turning into adulthood! Victoria even invented the idea of a 'fun' Christmas.

"Christmas became fun. Albert liked Christmas trees, with candles. Soon lots of families in Britain had Christmas trees.
The first Christmas cards were sent in 1843. The Queen began sending cards too. She gave Christmas presents to palace servants. Palace cooks cooked 50 turkeys and a side of beef for Christmas dinner." http://www.bbc.co.uk/schools/primaryhistory/famouspeople/victoria/
This shows just how important Victoria was and how she has affected our lives right now. Christmas is still 'fun' and most people do celebrate and have a Christmas tree, send cards, have candles and take part in the original tradition. 


Invented Christmas, Set a mould for children of today.
40 year mourning period over Prince Albert. She was very sentimental, reminds me of Miss H. She stopped clocks at the time of day which Albert died. Had mourning jewellery over Prince Albert. This reminded me of the love Miss Haversham had for her partner who then left her at the alter.

Magwitch


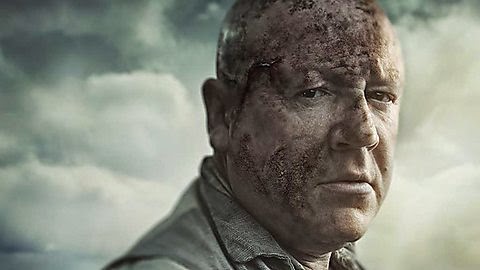
Magwitch is a character in Great Expectations who acts as a father figure to Pip. We first get introduced to Magwitch in the Graveyard and forge. He does good to Pip and takes the blame for his theft in the story. He is a good and bad character. He is shown to be an intimidating big man who is a little scary. In the BBC series and film he has scars, cuts and mud all over him and his face. I love the clever prosthetics and makeup used on him which reminds me of burns and abrasions we've been learning in class. He is a prisoner who has got unlucky through his life. He wants to find happiness but finds himself in difficult situations. He is also an orphan alike Pip. He is first seen taking food and stealing by Pip. Pip is very intimidated and warey when he first meets Magwitch. 


 How to create Burns:

Products used:

Gelatine (3 different types)
Illamasqua translucent powder
Hairdryer
Spatula
Supracolour Palette
Vaseline/Glycerine 
Fake Blood


Using gelatine you can create different prosthetics including burns which we did in class today. You can buy this from Charles Fox/ASDA and Screen Face. ASDA's is a food gelatine which can still be used. Each have different methods of melting the product. For the block gelatine use scissors to cut of a cm thick piece this can then be placed into a dry bowl and put into the microwave at 15 seconds and then check and then another 5-10 seconds more. Gelack gelatine comes in a tube which you should put into the microwave in the tube and then put it in for 15 seconds and then take out and shake and then put in again for another 10-15 seconds, the more it has in it the longer it will take to melt and be ready to use. You can use this type as many times as you like reheating it where as the block you have to throw away once activated to heat. For the type from the supermarket you must read the package to check what to do but usually it will tell you to add hot water to the powder. There is no reactions with skin with gelatine, or it is very rare. 

You do not need any protector for this method at all, gelatine is very easily cleaned up and easily applied to the skin. Make sure to use a spatula and have the area of skin dry. Test the temperature with a spatula to your own arm and if its a warm but not too hot temperature use onto models skin and spread over the area you want to cover, you have to work very quickly for this. Make sure the edges aren't too thick. Use a hairdryer on a cool setting and dry the area, use a spatular to pat over the gelatine area to make it appear textured. Powder this with Illamasqua translucent powder with a powder puff. Then use your supra colour palette in red tones, purple, blue, black and brown to paint over the different lumps to create a 3D effect and to make it look more realistic. You can pat and rub in with your fingertips too. You can then use Vaseline/glycerine and fake blood over the top of the fake wound to make it look sore. 
Manipulate the area until you're happy with the effect. For newer burns you want to have it shiny, smooth with deep reds and blues. 

For an old burn you want it to look very matte and pitted its not as much of an intense colour when it gets older.

You also need to think about how the burn happened, was it a fire/chemical/heat burn? 
Look at photos of real burns to get an idea of how the burn should look to make it look even more realistic. Hold the area up to the mirror to get an idea of how it looks from far away. 
Make sure the caps on the bottles are tightly done up. 

Remove with warm water and soap. 


Miss Haversham Assessment Practice (More Theatrical) Leading Up To Final Assesment

Today was my practice of my Miss Haversham ageing look. I followed my facechart and learnt a lot from practising it ready for assessments. It's definitely important to practice the look so that I can be able to continue the look a few weeks after for continuity. I want to make both examples of my look as accrete as possible so today I took the time to decide step by step on how to create my look.


Products used:
Supra colour Kryolan
Skin Base Illamasqua
Illimasqua translucent powder
Charles fox eyeshaddow set
Duo lash glue
Illimasqua smokey eyeshaddow pallette
MAC Shine


Firstly I cleanse toned and moisturised my model, ensuring her skin was prepped for the makeup. The n I applied skin base onto all high areas of the face including the forehead, cheekbones, nose and chin to make these stand out the most to give an aged look. I then blended the white over the other areas buffing in the colour to give it an even effect.

I then took a red/blue/black/white mixture of supracolour and made my model frown so I could apply a thin line on each of her frown lines/smile lines etc so I could do the ageing process. I buffed in any harsh lines. I used a red/purple blend patted over the eye area. I then applied MAC shine over this to give it a glistening effect. I did age spots on her nose with a small brush but realised that Miss Haversham would not have age spots as she was not exposed to the sun a lot. I will take this out of my final design for Miss Haversham. I used translucent powder generously over the forehead, cheeks and nose to give my Miss H a dry skinned look.
I also applied MAC Shine over Miss H's eyelids. I dusted a little yellow powder under her eyes to give a sore effect.


To create the sharp contour I made both sides as even as possible by using a flat foundation brush firstly to draw the line on blending it out with greys afterwards under the line drawn as an outline. I found this a good way to get a chiselled old effect.


For her lips I used duo lash glue as a thin layer all over the lips and then I made this crack whilst it was dry and pulled the glue in different directions to get a dry lip look. I then finished off by powdering the lips and using a thin brush with a red/purple colour from supracolour to make some of the lines on the lips appear swollen and sore.

I think to improve my Miss H look I will continue to use the same order but take away the age spots from my design. I want to make the yellow less obvious and add more of a soreness around the eyes instead. making her eyes look puffy. I want to make Miss H look as old as I can with it still being blended with no harsh lines. Her lips signify 'caged life'. Her eyes are glistering. Her complexion is sallow and pale, as she never leaves the house, her skin is more than dehydrated as well as her lips. Her skin is fighting itself to constantly try to repair itself but Miss H does not have any nutrition to feed the skin leading to more wrinkles and ageing of Miss H face. 

Thursday, 2 April 2015

Ripped Fabrics: Miss H Styling Idea

For my Miss H studio shoot I want to use ripped fabrics around her chest and back so it'll show through in the images I take for the front sides and back. I have a small budget so will be using a material such as tissue to rip in different areas to get a ripped tissue effect. I took inspiration from this image by Olya Kuryshchuk. The idea behind the dress is that it is a ripped bridal t shirt. It includes cuffs by Tiffany and Co. I love the freedom of the post and how the model appears as if she has just jumped into wind with dramatic hair floating mirroring the fabrics of her clothing. I hope to incorporate elements of this ripped tissue fabric into my styling for Miss Haversham.

Wednesday, 1 April 2015

Miss H Practice 2 (TV)

Today I used a facechart to progress my look for Miss Haversham. This will help when it comes to finalising my look and will especially help when it comes to continuity. I've put the wrinkles and lines exactly where I want them to be for both my shoots. The idea is to have a theatrical appearance to the ageing I'm using, this time I've made the look a little more subtle for ageing to be more suitable for TV, I will try next week to make the look more theatrical so I can experiment where my Miss H would be suitable for. I'm using the ageing techniques we've used in our technical classes to bring out all the bad features of the face. I also have used supracolour to do this as well as the steps which follow:


Products used:

Matte Primer Illamasqua
Skin Base Illamasqua
Supracolour palette
Illamasqua eye shadow neutral palette
Fennel, pepper and Carraway from Charles Fox eye shadow palette
Duo Glue
Blush Palette

How to complete this look:

Firstly prep your models skin, cleanse tone and moisturise.

Add a primer all over the skin for a smooth makeup application and a blank canvas

Add skin base over the highlights of the face, the forehead, the cheekbones under the cheekbones, cupids bow and chin. Shade a strong grey chiselled line on the cheek bones to make the face look more deadly. Shade the sides of the forehead, the rest of the face.

For the cheeks add a little rosy blush to make Miss Haversham look flushed

Use a thin layer of duo eyelash glue onto the lips once dry get your model to rub with fingertip to make it look very dry and peeled. Add a little redish pink to make it look een more sore making the lips look caged and using red in the cracks of the lip to relate to Miss Havershams life -caged.


I then moved on to adding supracolour in a brown/yellow and a little red to make lines appear on the forehead around the lips and adding crows feet and a little frown line. 
I made Miss Havershams eyes quite strong for this look. I wanted them to have a yellow tinge to them to make them almost look bruised and extremely tired. I darkened the lash line of both top and bottom with a dark brown Illamasqua shade. I made sure this was lended well in. The outer eye I used dark circle using a grey/purply colour and blended this into the sockets from the supracolour pallette. 


To finish I used a large amount of translucent powder to make the nose and cheeks look considerably dry.