Thursday 30 April 2015

Miss Haversham Assesment 1 (Original Look)


Estella (Final Outcome)


Miss Haversham Ases

My images from my FIRST assessment of Miss Haversham. It includes styling using tissue material to relate to my research. It also includes the facechart and hair designs from my progression. 


I hope to be able to recreate this look for my continuity shoot in a few weeks time! I will follow the same steps to make more of an exact representation. 

Timed Assessment Second Attempt (Continuity)

Here are some mobile images from my second continuity shoot for Miss Haversham. I felt the assessment went well but feel the forehead wrinkles were too thick and spaced out compared to my first attempt.


I really liked the hair I did for my second trial and felt it went well for the continuity aspect.

American Horror Story Inspired Hair

American Horror Story inspired hair was completed by using:

Pins
Curling irons
Sectioning Comb
Paddle brush

To complete the following hair styles I used these steps:

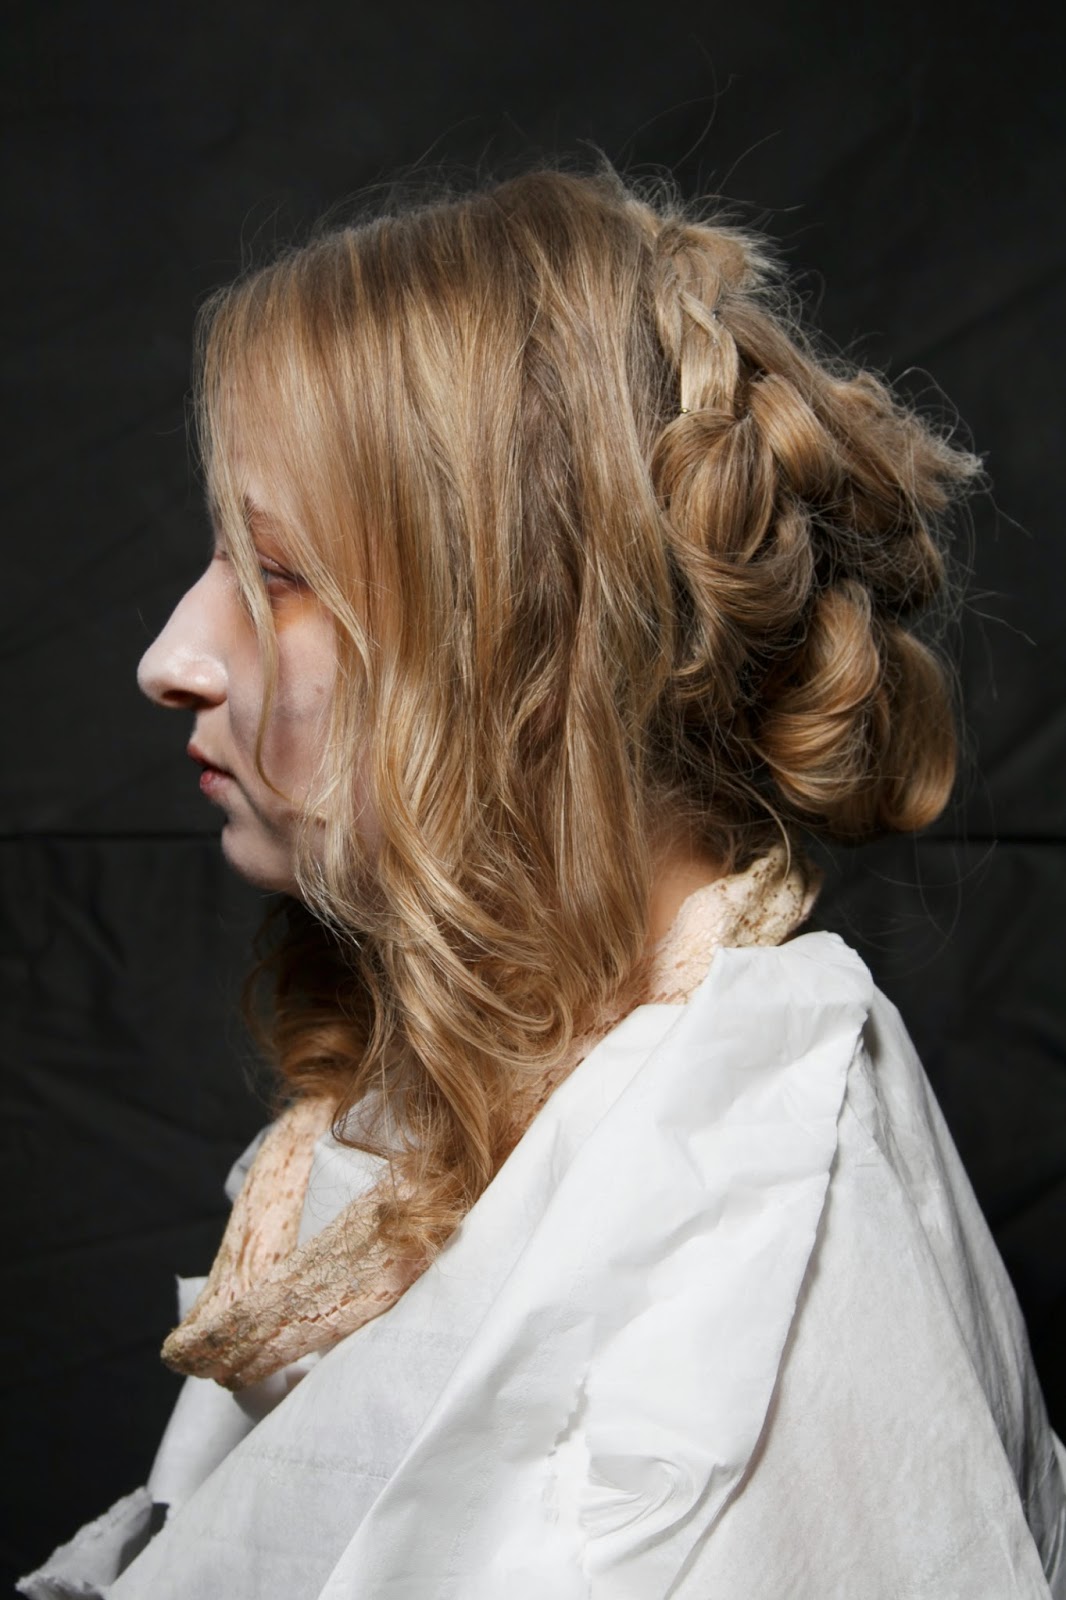
I started by brushing the hair out with a paddle brush. I then Sectioned the hair at the front into a side parting, I then sectioned this side into four sections by curling each section (2-3 inches wide) I rolled the curling irons under this time ensuring all hair was sleek in the tong for a neater appearance. I let it set by keeping it in its curl and pinning it underneath. This is so it'll set and be a stronger wave when its taken out. I then did the same to the other sections working down towards the ear, I ended up with four sections this side. I then continued onto the other side and did 3 even sections as theres less hair this side because of the side parting.
I then pulled the sections from the back into curls underneath themselves These were even sections too, I also pinned these in place like I did with the front curls. I did these parallel to each other instead of side ways like the front.


I then carefully took out these grips from the curls to create a new style. The curls came out as bouncy waves. I teased the hair a little underneath the front sections for added volume.


I pinned the front parts in little pin curl shaped flicks.


For the back I rolled the hair carefully into itself continually through the sides of the hair. I pinned this in place using hair pins. I really like how the style turned out with references to AHS/Contemporary Victorian Hair. 


For the next style I used a really simple technique. I carefully took out all of the pins from the first style. Then I used a brush and my hand smoothing the hair the other side of the brush and it created this look.  A very sleek but big/bouncy rounded bob type look. 


For the next style, I took my head and shook the hair, tossled it with my hands and made this very big curly bouncy hair look, that simple!


Wednesday 29 April 2015

Miss Haversham Continuity Assessment


Gothic Fashion Lanvin

From LOVE Magaziene I found this strong powerful image which says to me 'gothic horror' I love the blocked brow effect with the strong dark ages and off yellow hair effect. It reminded me of a fashion version of 'Miss Haversham' from Great Expectations. The pose shoes evilness and I like the way Lavin have used a clownish effect with this image. The white gowns reflect of the thought of 'innocence' but the faces and pose says directly the opposite. The white reminded me also of Miss H as she stays wearing her wedding gown even though she was jilted at the alter. I want to show a strong pose when it comes to my final image with meaning behind the makeup. 

Tuesday 28 April 2015

Fashion image: Bottega Veneta

This image by 'Bottega Veneta' showed a dramatic feeling of being 'trapped' 'caged' 'tourtured' and 'abandoned' these are emotions I want Claudia to represent from Quentin in my project and shoots. I want Claudia to be a vulnerable character who is taken for a fool. Quentin's persona is overpowering and controlling.

Thursday 23 April 2015

Final Estella Hair

Todays images of my Estella look. I thought the hair element of the assessment went well and I really liked the romantic curls I created with hair falling like a 'waterfall' style.


From the side I like how the pin curls are raised and quite thick on the sides of the hair.

Claudia, Quentin and Miss Laderman Research

Today I have been brainstorming Claudia, Quentin and Miss Ladderman as well as Claudia's apartment. I feel I now have a better understanding of the characters and how to build on these characters for my mini series. 


Wednesday 22 April 2015

Modern Day Bridal Hair & Makeup

Today I took the time to practice a bridal makeup and hair design for a modern look. From practicing Miss Haversham it has inspired me with bridal looks which I've really enjoyed creating. These are the images I've taken inspiration from for my look.


And my outcome:


My client wanted a really pretty subtle look which she could wear for her wedding day in July. She doesn't wear much makeup usually and wanted the makeup to stand out in photos. I chose a really subtle pinkish brown for the lid with a champagne undertone added with a matte brown/taupe for the crease. A small black wing for liner added with 'Kinda Sexy' lips by MAC. I will add eyelash extentions for the day for a fuller lash look. I highlighted under the brow bone with bananna powder and completed the brows by shaping and filling them in with 'Fling' by MAC. 

As for skin I wanted to add makeup which would show up naturally but perfectly in photos. I used Charles Fox yellowy concelar under the eyes, around the nose and chin and any redness with a thin layer and Fix+ by MAC. I also used MAC Face and Body foundation for an even natural sheer base. I really loved the foundation on my model. I then powdered with Illamasqua translucent powder. I used 'dainty' blush from MAC to add warmth to my models cheeks. I then contoured the face under cheek bones, sides of nose with a small brush, under jawline and temples for a sculpted look using Anastasia Beverly Hills contour kit. 


As for hair I curled the whole head in neat sections. I then sectioned a pony tale at the back of the head and used pin curl rolls of hair to clip into place hiding the clips. I then sectioned the front of the hair in a middle parting and backcombed under these layers and twisted the sides in place and pinned these down. The back had a slight bouffant too for where the veil will sit. I then took the rest of the curles that were flowing down and encourporated these into the style. I finished with hairspray and comb smoothing the areas down. I really enjoyed creating a contemporary bridal hair style. 

Tuesday 21 April 2015

Wounds/Cuts

To create a wound:

You'll need:
A gelatine scar, ready made
'Mould release' Barrier
Petrolise (fine spray) to put on each side on the gelatine mould
Witch Hazel
Cotton Buds
Talc Powder
Wound colour (supra colour and fake blood)
Protein remover

I created two different wounds as I wasn't pleased with the first one I created and got the look I wanted for the second design. Firstly add a barrier to the area that will be covered. Use petrolise with a cotton bud as a thin layer on each side of the gelatine scar. You can use any shape you like. Gelatine is highly recommended as its not going to react with anyones skin. If you cant use latex, use preside. Use the petrolise on the area that'll be used on skin. This must be clear now on both sides of the mould. Now press onto the skin. Push down hard on each edge firmly with a cotton bud, otherwise edges will stick up. Use witch hazel and a cotton bud to bled away the edges (this will melt harsh edges away to make it look realistic) of the mould, you really need to work at this continuing to use circular motions with the bud to disintegrate any harsh edges. It'll be a milky colour and make sure no edges are uneven. Use baby powder on the top of this using an old brush. Now fill in the middle how you like with blood/wound colour. You need protein to remove and wipe off.

For my second attempt I used an old brush to flicker the blood with my fingertips.